Tuesday, August 25, 2009

Is it a pig pen or an observatory

After about 2 years work has finally started on what is going to be the observatory. The location as to where we were going to put it has hopped around that garden quite a bit, but finally it has settled down to what was once the pig pen....
The good thing about this location is that at least parts of the 4 walls are standing, which will reduce the amount of construction required and as it is an existing building we are just repairing we wont have any issues with planning permissions.
The down side is that some of the walls we knocked through as some point in the past so needed to be patched.
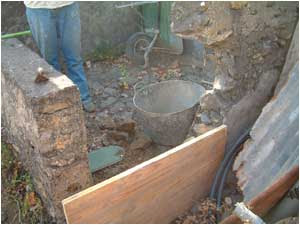

Starting to put the boards in

One layer of concrete later


A happy Theresa


That layer done


Time to move things up

The wall remade back to the point it was in 1950 when it was built (we know it was 1950 it is written on the top of the wall at the front)

Monday, August 24, 2009

Patching up walls

One small job that was needed was to patch the wall in the kitchen where we removed the old fire place hood.. This needed doing as we will be putting a beam in to hold the chimney up.

Now I don't know if this beam is needed but we have noticed some cracks on the roof that seem to lead from the base of the chimney. so as I don't want it coming crashing down on my head one day when I am cooking we decided to put a bean in to support it... we even decided to cast the beam ourselves...

I just realised that we never took any photos of the casting of the beam ... oops

Patching wall

Tuesday, August 18, 2009

A new home for the weather station

The old location for the weather station temperature and humidity sensor used to be the front of the house. The only down side of this location was that at certain times of the year It would get direct sunlight which would upset the readings and not give a true reflection of the current ambient conditions. So once the sensor had come back from repair (having given up after 2 years the replacement only last 3 months so we sent it back under warranty) we decided to construct an new home to protect it from the sun. But it still needs airflow in order to get a correct reading. So what we needed was a Stevenson Screen.

So here it is. In fact it is made from the plastic bases that sit under plant pots. Construction details can be found here

Finaly the battery house has a roof

About a year ago we started to build the housing for the solar power electronics and batteries, See the post Work in Progress. But after the electronics housing was done, we just never got around to working on the battery housing. Well we have finally put the roof on the battery housing...

First I wanted to improve the access to the kitchen roof, by cutting the parapet wall to create a step on to the roof. you can see the new access below, the funny block on the roof to the right of the opening is the cover for what I assume was supposed to be a chimney but as this is now above the entrance to the kitchen we will probably not use it as that ... but it will be useful to get the water piping on to the roof for the solar hot water heater.

New battery house and access to kitchen roof

Now we have the structures for the solar power electronics and batteries all I need to do is put the tiles on the top and render the outsides, add the doors and wire it all up... Lets hope that it will not be another year before the next bit gets done.

Solar power housings.

Tuesday, July 14, 2009

A visit from the family

All the work this year has been done, manly, so that the outside is safe for the arrival of one 14 month old. My grandson Theo. Well he arrived last week accompanied by his mum Sarah and Rachel and her boyfriend Brett. It was a bit of squash getting four extra bodies in the house but we made it and being able to all eat outside was a god send.
In the week that they were with us we spent every day out, as Sarah and Rachel had lived here for a few years when they were young, they wanted to see places that they remebered from before.
One of the trips was a visit to the Roque del Munchacos and observatories

The obligatory stop for photos

Sarah and Theo at the top of the mountain
Rachel up the mountain

Thanks to our friend Sheila and her husband we all had a tour of the Galileo telescope (Italian) and the Magic (Gama Ray telescope).

Everone in the car park for the Italian telescope.

One of the two Magic telescopes, guess who is visible reflected in the box

Yes thats us!

It was great to see the girls again and meet Brett for the first time. But for me it was very good to see my grandson. I last saw him when he was only one month old, He has grown a lot. I think that is one of the few drawbacks of living in here. you just don't see your family that much.

They seemed to enjoy there time here, but now they are gone we plain to have a few quite days before getting on with more work on the house.

Saturday, July 04, 2009

And now water in the kitchin!

The final plumbing job under the kitchen floor is to lay the water pipes, cold feed from outside and a hot feed, wow hot and cold water in the kitchen.......!!!!

The original cold pipe arrives in the kitchen where the old sink was... half way up the wall and just ends in a tap. So we needed to remove the old tap and then connect the new piping, run it down the wall and across the floor to where the new sink will be. We are thinking to add a water filter under the sink so the feed to the bathroom and hot water heater does not connect directly to the cold feed.

Hot And Cold piping

Once all the piping was laid then had to insulate the hot water pipe . This is due to concrete sucking the heat out of the pipes. Well I have found this since we messed around with the hot feed to the current shower. I used squirty foam to insulate the pipes... as it is slightly simpler than the type that comes preformed.

Added insulation for the hot line - I love squirty foam.

And once the foam was set it was time to poor the final layer of concrete so that we have a new floor.... It does not need to be that great as it will be tiled in the end.

And now we have a floor again.....

The last bit of work is to connect the hot heater to the new cold feed. The pipes go up the wall, heading for the roof and the location of the future solar hot water heater, so it was just a mater of a longer connecting pipe and it was all done.

Hot water heater before new cold connection


And after

Saturday, June 27, 2009

Look A Patio


Finally after a week of intensive concrete pouring we have a patio. The concrete was poured in sections about a meter wide. Prior to each section being poured a small strip was laid to provide the level. Each pour took about 5 loads of the cement mixer. Some of the pieces had extra complications like a drain channel to take the water from the front steps down and out through the rain water drain.
But finally after a week of hard work and the purchase of a gazebo we now have some where nice outside to sit.

Monday, June 22, 2009

The patio takes shape.

Now mostly of the preparation work is it is time to surface the patio (outside Kitchen / barbecue area) The original surface had a large slope and although it was smooth was not that good when you wanted to sit at a table. So we decided to make a flat area ... The only problem was that the underlying ground was mostly solid rock.. So we desired that instead of trying to dig it all out we would just rise the level. To get it right it had to be in two steps... so that the patio would not be above the kitchen floor!!!!

There are a few more drains to go in though, the Rain water needs to be taken from the roof and from where it runs down the back steps. and the sink in the outside kitchen needs to be connected. So these pipes were put in first before the top step is added.
Once the drains are all done its the lower level was filled with rubble (most of this came from demolition in the kitchen). it was the plan to lay the lower level in three sections, rather than using shuttering to get the levels I decided to us a method that I had seen the local builders use. A line is strung to give the level and then a "wall" of concrete is laid to this level as below.

Once the level has set then the first part of the patio was laid... Only one small problem was that the concrete was not fine enough so that the surface was not that good. This was solved in later poring by adding a few shovels of sand. The quality of the surface is not too much of a problem as we intend to tile the area sometime.... (when we have the money).

Sunday, June 14, 2009

Look a Flower Bed


As I explained in a earlier post behind one part of the wall we were going to put a small flower bed in. Well here it is. Having taken some good earth from a pile we had down the garden and mixing it liberally with some manure we have a very nice light soil to plant things in. The first thing to go in was a flower that had to be moved from the garden outside the kitchen window which is being removed. Then the other two things to go in were some herbs; thyme and rosemary. The flower bed also has scattered around some bits of broken flower pot which as well a looking pretty also try and stop Tabby from digging up the plants and using the place as a loo.

Thursday, June 11, 2009

It's all gone down the drain. (Drains Phase two)

One small reason for all the work on the outside kitchen was that we have to continue laying the main drains under it, with all the connections for the sink in the outside kitchen and other services. So with the work on the walls approaching the end of the first phase it is now the time to dig the trench for the drains... To be honest I have been dreading this as there is not much soil around here so it was likely that we would have to dig the trench through solid rock.

We were in luck though.... as we found an old drain that ran from the garden at the right depth right through the kitchen to the old water tank that will be the bathroom. This took a good bit of excavating (including the demise of our heavy duty SDS drill) but once this was excavated, it only needed widening a little, it was simple to lay the drain...

Excavated trench outside,


under the kitchen,


And out to the entrance way

OK the connection to the existing part of the drain was a little complicated but in the end it all went in OK and was coved with concrete.

And here's the wobbly bit...


Next to go in was the pipes for the grey water and rain / ground water drain. A little more work as the grey water drain includes the kitchen and outside kitchen sink drains and also needed to be cut into the existing grey water drain the goes to the temp. kitchen.


Cutting the new grey water drain into the current one


All the drains laid
You will notice as well as laying drains there are lots of power conduits going in for power to the outside kitchen and the outside loo (will one day be where the washing machine will go...) and lighting.

Thursday, May 28, 2009

Look Ma!.... A wall!

Well I never its a wall, OK its a little wonky in one or two places, but that will be OK once it is rendered. Now I have 3 piers to cast. I have had a few problems with casting concrete, mostly in making sure that the concrete stays where it should and the molding does not "Blow out".
I want these pillars to look good as I don't plan to render them, so I have spent a good bit of time preparing and oiling the wood that will be use. so that it should produce a nice smooth finish. I have also used to pieces of pipe and some wire paces through the shuttering (the mould for the pier) at the bottom to secure the bottom together and stop the mould from "Blowing out". Lets hope all the work is worth it....

Talking of piers we have also cast the bottom of the arch between the kitchen and dining room...

Saturday, May 23, 2009

Tip Top


Things are progressing well on the outside area and one part has had it's final top section cast. Behind this wall is a small area between the wall and the steps which we have now decided to make into a small garden area for herbs and flowers.

Monday, May 18, 2009

Toddler arriving in two months, need safety wall

With the family due out in two months we need to put up a small safety wall on top of the current terrace wall, as there is a 2 meter drop there, which does not combine well with a 16 month old grandson. We plan to put up a two breeze block high wall to act as both a safety barrier and a wind brake for the house garden come patio. The top of the rock wall that holds the house terrace up is not exactly flat or totally level but with careful work should be OK.
The wall will exists of 3 sections separated with cast concrete piers on one side of the steps and a short section between the steps and the house ( though this bit is not so urgently needed as there is a flower bed there.). I hope to have this finished and a gate added above the steps if there is time.
Well I got both ends of the wall stared, and I hope that they are level....

Thursday, May 14, 2009

At last some work on the Kitchen

After two years of living with a hole in the wall between the dining room and the kitchen we have started to make the hole an artistic arch... (OK it may take another two years to get it done the way things have been going)
First we must run a few power feeds.... just a few.
The reason for this is that the main switches for the kitchen lights, outside lights and for the hot water heater are going to be located on the inside of the arch so they need to be put in before the left side of the arch is cast in concrete.
While I was excavating the base of the arch, for the cabling I found that the wall just sits on the ground ... only a few inches below the floor... I think that this was rock about 50 or 60 years ago when the house was built but now its a sort of hard clay... A little worrying but mostly OK... (I hope), so I have to dig a little deeper and wider than I wanted and then cast a foundation for the side of the arch. Now I just need to wait for that to set before I can cast the base of the arch.

Saturday, May 09, 2009

Down the tube and round the bend

Every since we moved in, the outside of the house has looked a disaster and as was mentioned in a previous blog Dodging the Rain we have started to work on building the walls to hold back the terraces. One of the key things that needed doing was to re run the water pipe round the back of the wall so that it was hidden from view and to stop us from tripping over it all the time.


So one Saturday Helen set about measuring and cutting the steel piping that is used here for water pipe. The funny thing is that although Spain is fully metric the pipe used is 1/2 in and the thread cutter is British Standard Pipe Thread (BSPT). Once Helen had cut all the bits of the pipe then it was a matter of putting a screw thread on each end of the pipe and rough fitting it together.


Next comes the tricky bit. You then need to unscrew everything and put it back again only this time you need to wind the sealant into the threads at each joint, in the past horse hair was used but these days you can buy something in a tub which is like industrial strength dental floss which is a little easier to handle.
After all the pipes had been screwed together it was time to cross fingers and make the final connection to the mains. This connection was made and then breath was held while the pipe was checked for leaks, but none were found and we could breath again.


All that remained was to give the pipe a coat of paint to protect it from corrosion once it is buried and we were almost done. All that remained was a bit of concrete casting to finish off one level of the wall.

Sunday, May 03, 2009

"YEUCK" a Plague of almost Biblical Proportions.

Things have not gone that well this week. It started well on Monday with a fiesta in Los Sauces so Theresa was off for the day which meant we had a quite day. On Tuesday evening we came home as usual after teaching to find the kitchen window covered, on the inside, with large black flies... I think there must have been around two hundred of them..... Its hard to get flies out of a house when there are fly screens on most windows to stop them coming in! We ended up using the vacuum cleaner to suck them up!
The whole episode sickened my stomach, Once most of the flies were gone I just went to bed and stayed there barricaded into the bed room till almost 3 o'clock the next afternoon. Just coming out to swat any new flies that appeared.
Theresa was so worried about me that she came home lunch time to see how I was doing...
After about 3:00 I finally got up the courage to search for what was the source of the plague. Once I moved a light into what was the old water tank and will be the bathroom I found the SOURCE, the remains of a Rat! Double Yuck! Tabby must have brought it in after killing it and left it there.
We have spent most of the rest of the week cleaning the house, including washing all the crockery etc in the kitchen. The result is that we have a clean house (and the cave of a water tank / bathroom) but nothing else much done, and I have been feeling very off mentally.

Friday, April 24, 2009

The end of the road

Well fianlly after about 12 years I have finally paid off all my debts. As some of you may know in the late 90's I got into some financial difficulties and ended with a large number of debts and county court judgments. One of these was with a company called Paragon Finance, I went to pay this debt of before I came out here only to discover that without my knoweledge they had been adding interest to the court judgment. So I have been fighting with them for quite a while to argue that I don't owe them any more than what I have paid them already, and a last this week the following letter arrived.As you should be able to see this letter states that the debt is paid in full. You sould have seen my reaction I was dancing around the kitchen. Saying "I've won, I've won".

The Crazy Helresa Concrete Slide of DOOM

Here we are with another Helresa contraption to make things a little more easy for us.
The Problem:
We need to pour concrete for the foundation of the wall repair two terraces below the cement mixer. In the past we have just carried it down in a bucket. This time there is quite a bit to move (about 8 to ten mixes) at 4 bucket loads a mix that is around 40 trips.
The Solution:
A rope slide... We have ridged up a line from the poles that hold up the vines out side the back of the house, down to a power pole on the terrace. Then the bucket gets slid down ... the concrete poured in to a wheelbarrow and then poured in to the foundation.

The Slide of DOOM

Poring concrete - There is a wheelbarrow there honest.

In Practice:
Once it was set up we discovered one small problem, the rope streches a little under load so that the bucket hit the ground on the terrace above its destination. But this was simple to solve, a little less in the bucket and put the rope up a little higher on the pole. Once this was done it actually worked quite well, most of the time.

The bucket on the slide.

Theresa did let go of the rope once or twice, neatly coating the power pole with concrete and almost decapitating me, but in the end we had the foundation done .. now its time for a shower and off out.The Finished foundations... A Good Mornings work.